VMware Cloud on AWS Optimizations in Storage-bounded environments. Part 1. Reduce amount of data you store.
Intro
It's no secret that many infrastructures in VMC on AWS are bounded by storage capacity rather than compute resources. That is, the number of hosts is determined by the usable capacity requirements on the cluster, while there are spare/free compute resources. This situation follows directly from the fact that VMC on AWS use VMware vSAN hyperconverged infrastructure as its primary storage, and therefore there is an explicit capacity/compute resource ratio. That said, there are four types of nodes available in VMC on AWS (or even two if we're talking about Reserved Instances since i3 is now available only on demand and M7i is in tech.preview and diskless in principle) and these ratios are not always exactly what is required.
Within this article I would like to talk about what you can use and what approaches you can take to optimize your VMC on AWS infrastructure, reduce the number of nodes, and thus pay less money to VMware and AWS. 😊
I will describe the various steps in the order I personally recommend.
Reduce amount of data you store
First step is related to basic IT hygiene. You don't need any additional solutions or technology, but you will need time to figure it out, as well as perhaps some organizational efforts.
The main point of them is to keep only what you really need and get rid of various waste. Following will be a few examples and the most popular and effective steps to reduce the amount of data stored.
Get rid of all unnecessary VMs/vmdks and snapshots
I don't want to populate on this for too long simply because I think it's pretty obvious, but the main thing is that there are already a lot of great papers written on this topic and there are pretty well-known ways to do it.
It is well known that in particularly large infrastructures there are many VMs that are forgotten, were created by mistake, or are not doing any useful work anymore at all but are still stored or even running on the infrastructure.
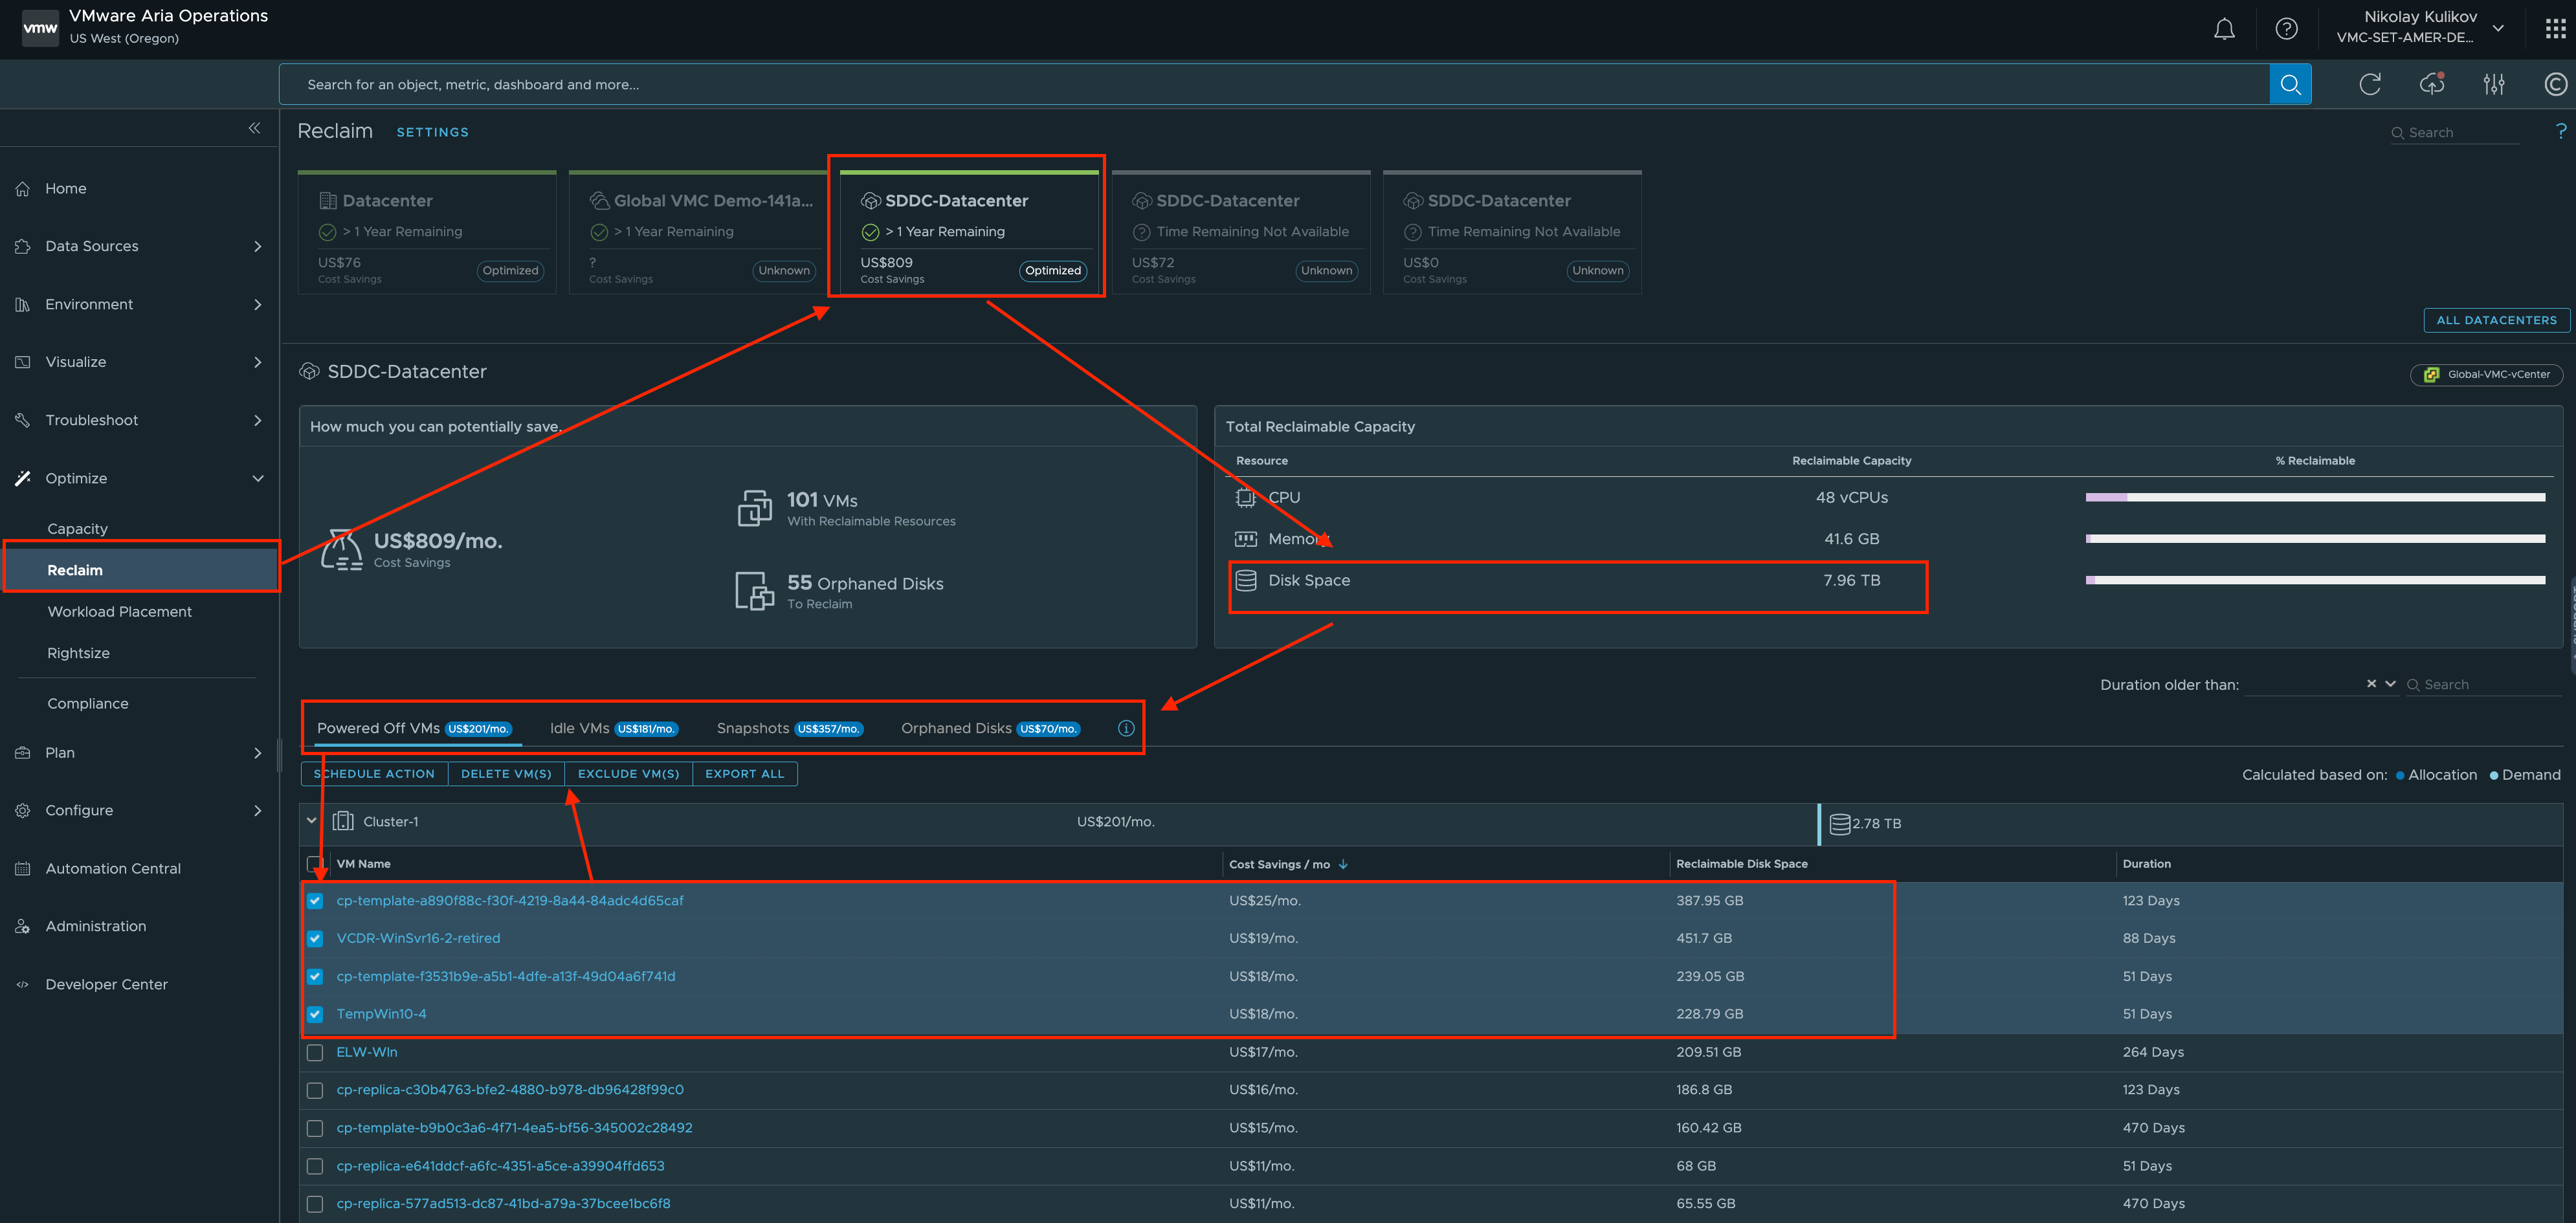
The first correct step is to get rid of such workloads. The easiest and fastest way is to run an analysis of your infrastructure using Aria Operations (ex vRealize Operations) to find such VMs. After some time (yes, it is necessary to avoid false positive errors, so the sooner you run the analysis the better) you will get a detailed list of such powered off, orphaned and idle VMs. You need to make sure that these VMs are really no longer needed and remove them. Similarly, you should do the same with orphaned vmdks, snapshots, etc.
It is a good idea to go through the entire list of VMs on your infrastructure to see who needs them and why. Yes, it can be really long and annoying, but it will give you a better understanding of your infrastructure and will also be useful for further optimization and/or better response in case of any incidents. I encourage you to actively use tags, VM comments, folders, etc. - so that this information can be easily retrieved anytime and by anyone in the organization who needs it.
Thin/Thick Disks
Many IT administrators, especially those who have been working with vSphere for a long time, are somewhat cautious of thin disks. I have even observed a number of companies where the use of Thick disks has been written into IT policy as a default policy requirement. Historically, this is because when using thin disks on VMFS volumes, there could be a performance degradation of thin disks as they grow/expand (note that in a normal and steady state, there is generally no difference between thick and thin disks). Although this effect was gradually reduced in the subsequent vSphere versions, the principle remains unchanged if we are talking about VMFS datastore.
But in the case of VMC you have to remember that VMFS is not used there at all. And the main type of storage is vSAN, which is an object storage system, and which does not use VMFS. For this reason, vmdk growth is not an issue and the performance for Thin and Thick disks for vSAN is the same. Therefore, there is no reason to use thick disks in VMC/A from a performance perspective.
The second global reason for using thick disks is to simplify capacity management in the infrastructure. Roughly speaking, using thin disks can (and usually does) lead to capacity oversubscription (Here's how you can check this value for vSAN). And in case when amount of data will start growing inside VMs for one reason or another, we can face lack of space on datastore and, consequently, I/O freeze for many VMs located on it. Of course, this can have catastrophic consequences for the operation of productive workloads.
The main way to avoid this is to monitor datastore occupancy and manage capacity efficiently and promptly. Using thick disks allows you to completely eliminate such risks at the cost of decreased storage efficiency.
vSAN Object Space Reservation
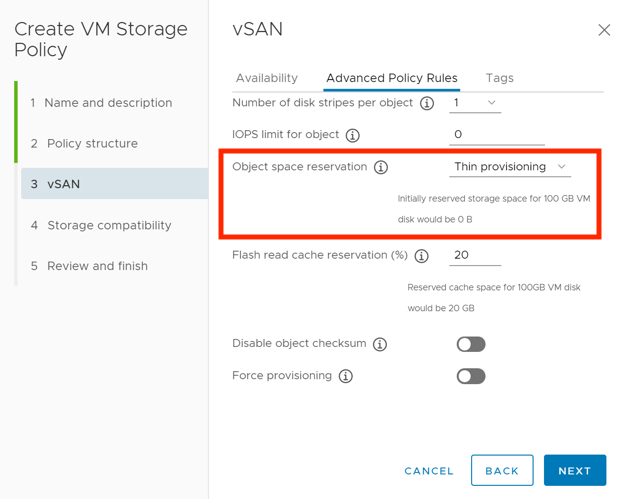
But for vSAN, there is a separate way to manage capacity oversubscription with Storage Policy - Object Space Reservation - to address this issue. At a more granular level, it allows you to set the oversubscription factor in advance by allocating 0/25/50/75/100% of capacity for selected vmdk on vSAN Datastore. This setting makes sense for Business-Critical workloads, where we want to minimize the risk of running out of free space or ensure that critical VMs always get the capacity they need even if the datastore is full and their IO does not stop. The main reason for this is that expanding a vSAN cluster in an on-premises infrastructure is time consuming. It can be hours-days (if we have spare nodes and disks, which is usually quite rare) or even weeks-months (if we have to order new hardware, install it in the datacenter, configure it, etc.). Thus, we will not be able to react quickly to a sudden and unexpected increase in data and carries risks of infrastructure availability.
But the fundamental difference with VMC/A is that it takes only MINUTES (10-20 minutes in most cases) to expand the infrastructure instead of days and weeks. Adding a new node or multiple nodes is just a couple of clicks in the Cloud Console, and then the new nodes will be added to the cluster, which of course results in an expansion of available capacity.
What's more, you don't even need to monitor datastore occupancy to avoid capacity overflow. VMC/A has a default (and this cannot be disabled) Elastic DRS behavior that when the vSAN datastore is 70% full you will be notified of a high level of utilization, and when it reaches 80% utilization the host will be added automatically. Thus, the probability of vSAN datastore run-off capacity in VMC/A is practically zero. Although to be fair, it should be noted that if all your clusters already have a maximum size of 16 nodes, then further expansion will be impossible and such risks remain, but the solution is quite trivial - do not use clusters of maximum size and leave a reserve for the addition of at least a couple of nodes by splitting one large cluster to two smaller ones.
Last important thing to mention - TRIM/UNMAP feature (I will talk about it later) is available/makes sense only with thin disks.
Identifying thick disks in the infrastructure
So, I hope I have convinced you that using thick disks (or Object space reservation) in VMC/A does not make enough sense from either a performance or capacity management perspective to pay for it in terms of reduced efficiency and paying for more nodes.
So, the first thing I urge you to do is to check your VMC infrastructure for thick disks or Object space reservation and seriously evaluate whether they are really required in your case for each specific VM.
To do this you can follow the steps below:
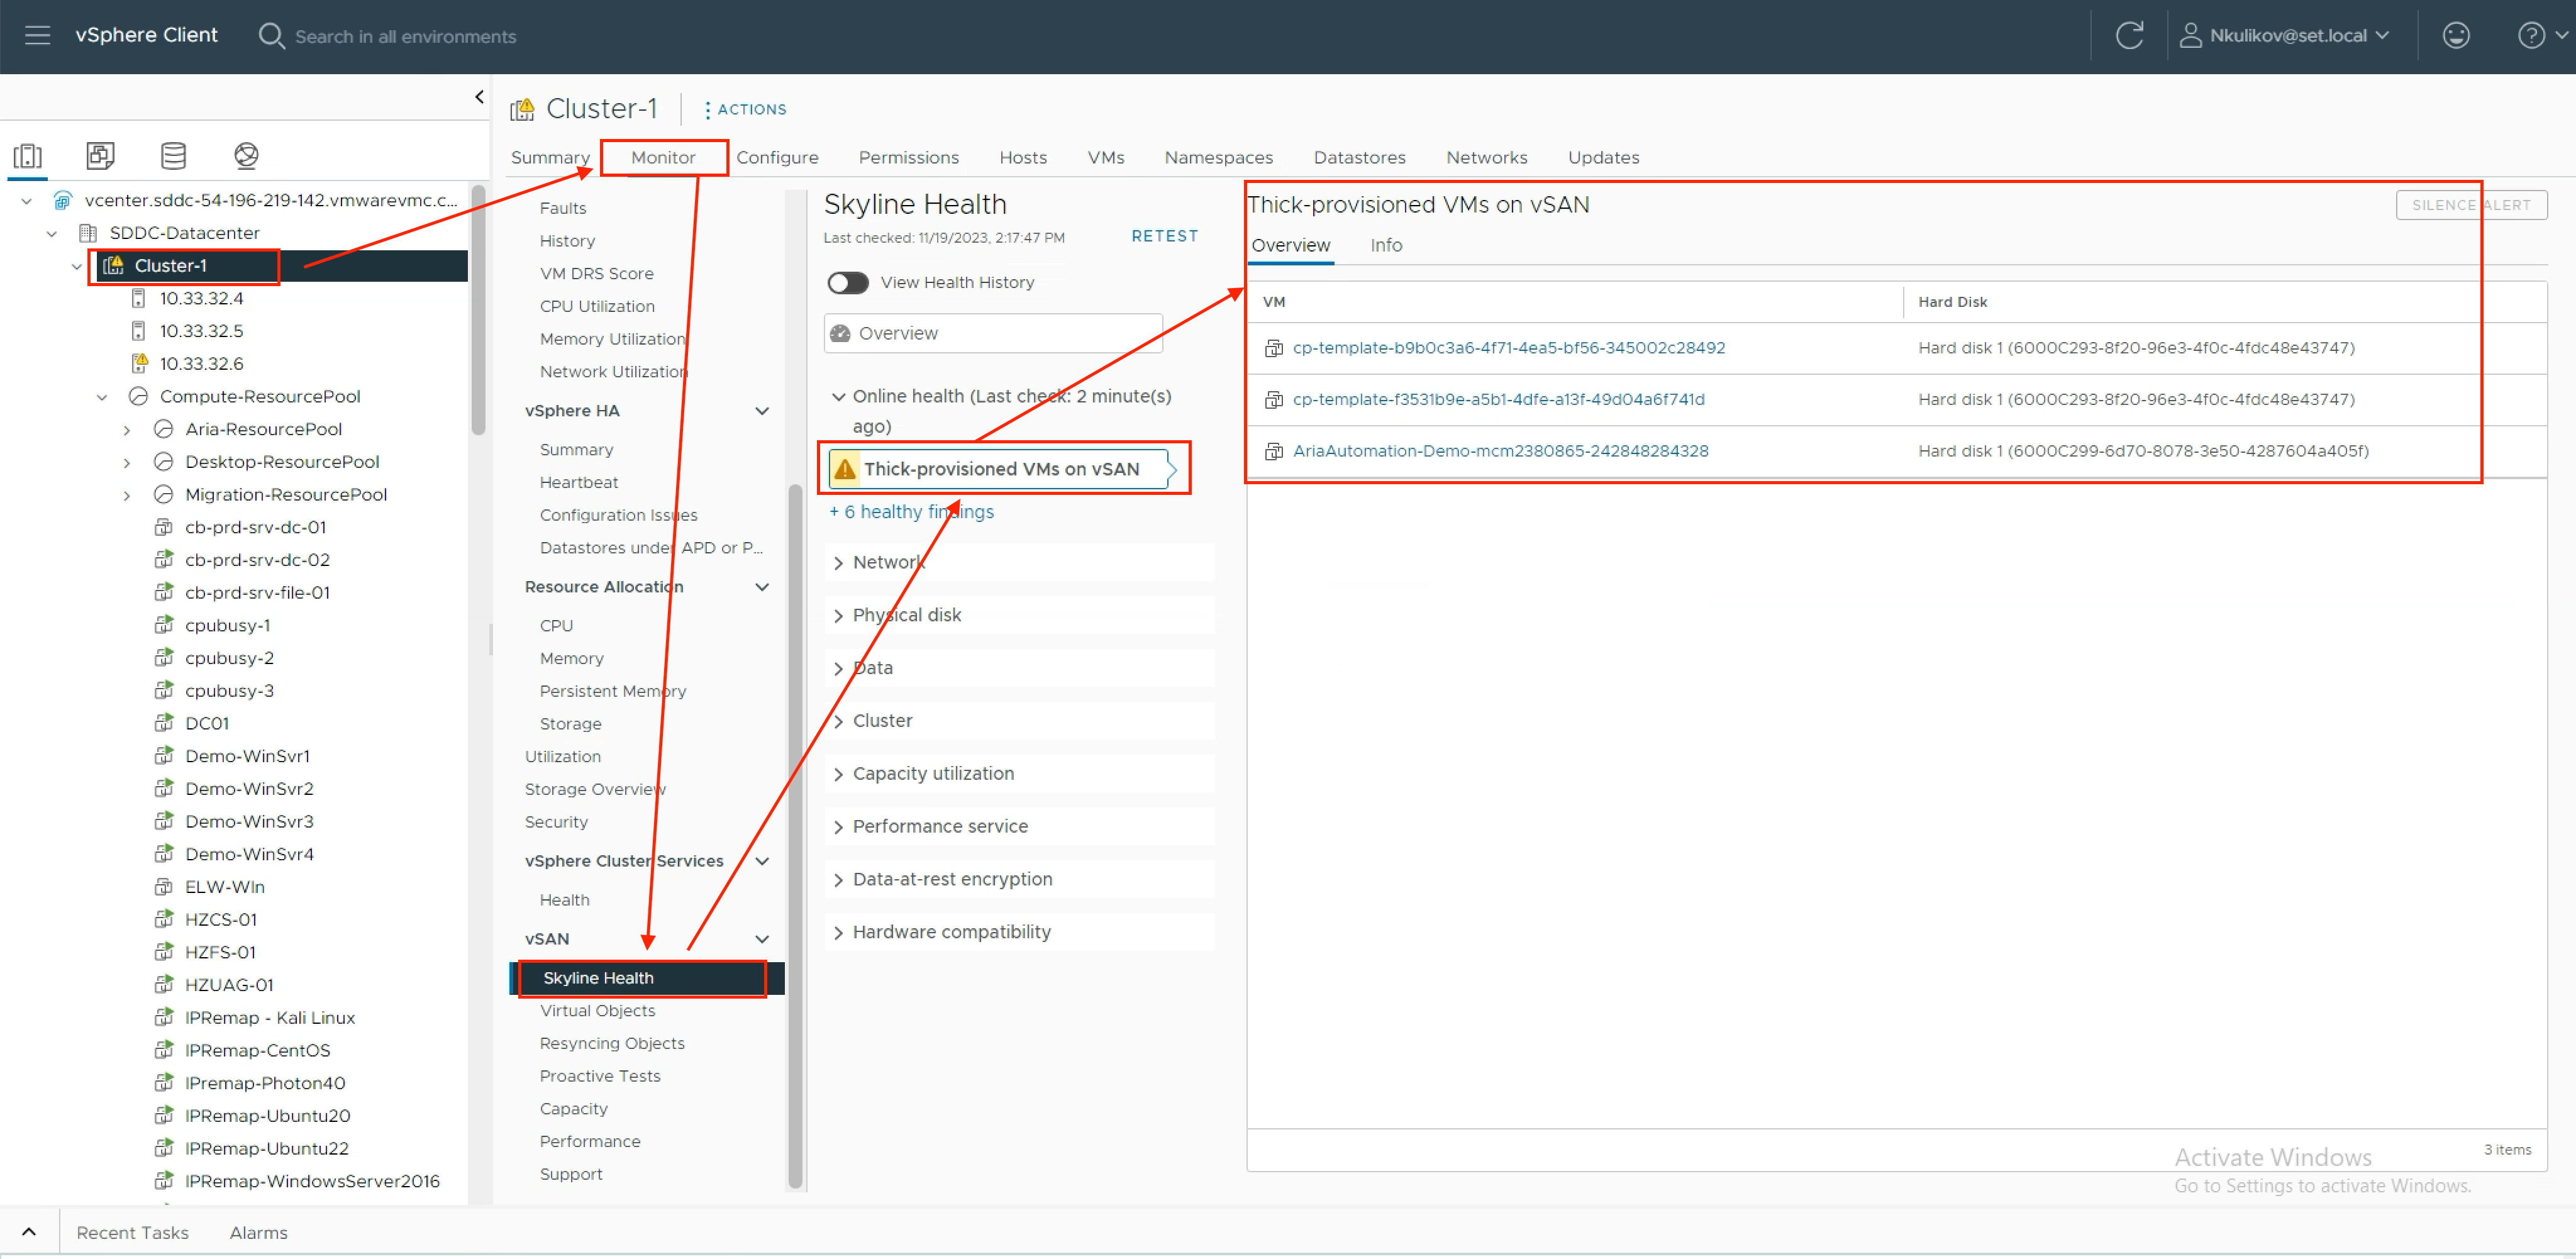
1.) Make a list of all vmdk/VMs that use thick disks. You can use the following tools to do this:
- Built-in check in vSAN/Skyline Health Check.
- Check the vSAN Storage Polices in use for Object space reservation customizations.
- Build the report in PowerShell(example), Aria Operations/vRops (VM properties) or any other tools like RVTools, LiveOptics, etc.
2.) Review whether you really need to use thick disks or Object space reservation for them.
3.) Change Object space reservation in the Storage Policy. To avoid a massive rebuild, it is better to create a new Storage Policy and attach it to VMs one at a time.
4.) Convert from thick to thin. This may require secondary cluster or additional temporary external NFS datastore (Flex Storage or FSxN) or cloning the VM.
TRIM/UNMAP
General overview of TRIM/UNMAP
The next point that follows the discussion of thin disks (the size of which, remember, is equal to the actual utilized amount of data, not the allocated amount) is: what is the actual utilized storage and to define it? Let me give you the simplest example - you have created a thin vmdk of size 1TB, but you haven't written anything to it yet. Then its size will be equal to zero (formally, of course, not strictly zero, but a few tens of MB for metadata, but it is not essential in this case). Then our guest OS will write 500GB of data there. Then the vmdk size will become 500GB, which is obvious. But, if we at the guest OS level remove 300GB of this data, what will be the size of the vmdk? In the general case, it can remain the same 500GB because the storage subsystem of the hypervisor has no idea what blocks have been deleted by the Guest OS and it can free them up for other uses by other VMs.
To solve this problem, the TRIM/UNMAP/DEALLOCATE commands were added to the block storage protocols. TRIM/UNMAP/DEALLOCATE are ATA, SCSI, and NVMe commands respectively that allow to send information that previously allocated and occupied data blocks have been cleared and are no longer in use.
First of all, when we talk about Space Reclamation, we need to clarify that for virtualization environments there are fundamentally two levels at which it can be performed.
The first level is when we free up space at the hypervisor level itself, for example when we delete a VM/vmdk or reduce the size of the vmdk and we want that space to be freed up on the datastore/storage. In case of VMFS, ESXi acts as an initiator and sends the list of freed blocks via the UNMAP command to the external storage. But because VMC on AWS does not use block-level datastores and the primary storage is vSAN, it works even easier. Since vSAN is fundamentally an object storage system that stores your objects (mostly vmdk and snapshot files in terms of capacity contribution, although there are other types of objects as well) in the format of multiple components distributed across the nodes and disks of the cluster, the moment we delete an object all its associated components are automatically deleted and that space becomes available for other data. Thus, when a vmdk is deleted or downsized, space on the vSAN datastore is freed up automatically and almost instantly (although on i3 clusters where dedupe is enabled this can take some time due to updates to the metadata tables and block map on the disk groups).
The second level, and partly more complex, is often referred as Guest UNMAP. The idea behind this is to make it possible to reduce the size of the vmdk itself, while freeing up blocks within the guest OS. For sure vmdk should be thin as there is no sense to do this on thick vmdks. But I hope you've already converted all your thick disks by now, as we discussed earlier. This will lead to freeing up capacity on the storage, as described in the previous paragraph. So, we want to make sure that when data is deleted inside the guest OS, the space on the storage system is freed up.
It is especially important to note that quite often we can observe a very unpleasant effect where the thin disk size gradually grows to the allocated vmdk size, despite the fact that we never filled it completely from the OS point of view. This is due to the behavior of some OS/file systems that prefer to write to new/empty or random blocks instead of previously filled (but previously freed up) blocks. Thus, it can almost always be observed that the longer a VM runs, the more we have such unused data stored.
An important point to discuss is the potential side effects of including TRIM/UNMAP. Here, if we don't talk about configuration efforts (more on that later), the only possible downside is the impact on storage performance, i.e. vSAN in the case of VMC on AWS. The point is that when the guest OS receives commands from the guest OS to clean blocks, the storage system must start cleaning and deleting them at its own level. This creates additional "background pressure" on the storage system by processing such requests. In the case of vSAN, this load is somewhat greater with deduplication enabled, as each deletion needs to be additionally reflected in the hash-map and metadata table and recalculated if necessary. In VMC on AWS, deduplication is only enabled on i3-based clusters, and i3en and i4i-based clusters only have compression enabled, which has minimal impact compared to a configuration without Space Efficiency. Also, obviously, the impact depends on the size of the vSAN payload as well as the amount of data that needs to be deleted - the more data should be cleaned, the longer it will take.
Thus, it is extremely difficult or even impossible to give even an indication of the impact on performance in general, but in my personal experience, in the vast majority of cases it does not have any noticeable impact, and in rare cases, it can be observed only at initial startup, when the amount of data to be freed is particularly large. But, I can't help but advise you to test on your infrastructure and with your workload if possible to be absolutely comfortable and confident.
Finally, I would like to point out that TRIM/UNMAP is a vmdk-level setting. And you can turn off TRIM/UNMAP for individual VMs or disks by specifying disk.scsiUnmapAllowed = false in the Advanced Settings of the VM. So, largely due to the fact that each vmdk on vSAN is processed relatively independently of the others (especially on clusters without deduplication), this can minimize the impact of TRIM/UNMAP for a particular VM.
Assessing the efficiency of enabling TRIM/UNMAP
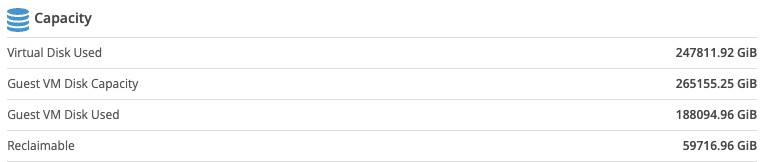
The next obvious question that arises is exactly how much data I can save by doing this. While this of course depends on your infrastructure, the answer is usually A LOT. It is not uncommon for the amount of data stored after TRIM/UNMAP to be reduced by 50% or even up to two times or more. Fortunately, there are very simple and quick ways to verify this and get accurate numbers specific to your infrastructure. To do this, you need to compare two metrics - the size of the thin vmdk and the amount of usable data, from a guest OS perspective. Fortunately, both of these metrics are available through the regular vCenter API (but you need VMware Tools installed for utilization information within the guest OS), so many monitoring and inventory tools have this information. The only point at which the accuracy of the data can be spoiled is shared and network disks. The thing is that from VMware's perspective, it's one vmdk, but each OS will see it as its own and write a fill percentage. Because of this, the total amount of usable data from the guest OS perspective may be slightly larger than it actually is. So, this gives a conservative estimate for savings - you can definitely free up that amount of space, but in reality, it may be even more.
As an example of such tools that will help to capture the necessary data, I would like to point out some of the most popular ones - LiveOptics, RVTools, Aria Operations (ex vRealize Operations).
In LiveOptics, once you run the assessment (in this case, the analysis time doesn't matter), you will immediately see a comparison of the two metrics:
In RVTools, you need to compare two columns - "In Use" from the "vInfo" tab (this is the vmdk size) and "Consumed MiB" from the "vPartitions" tab (this is utilization from the guest OS perspective).
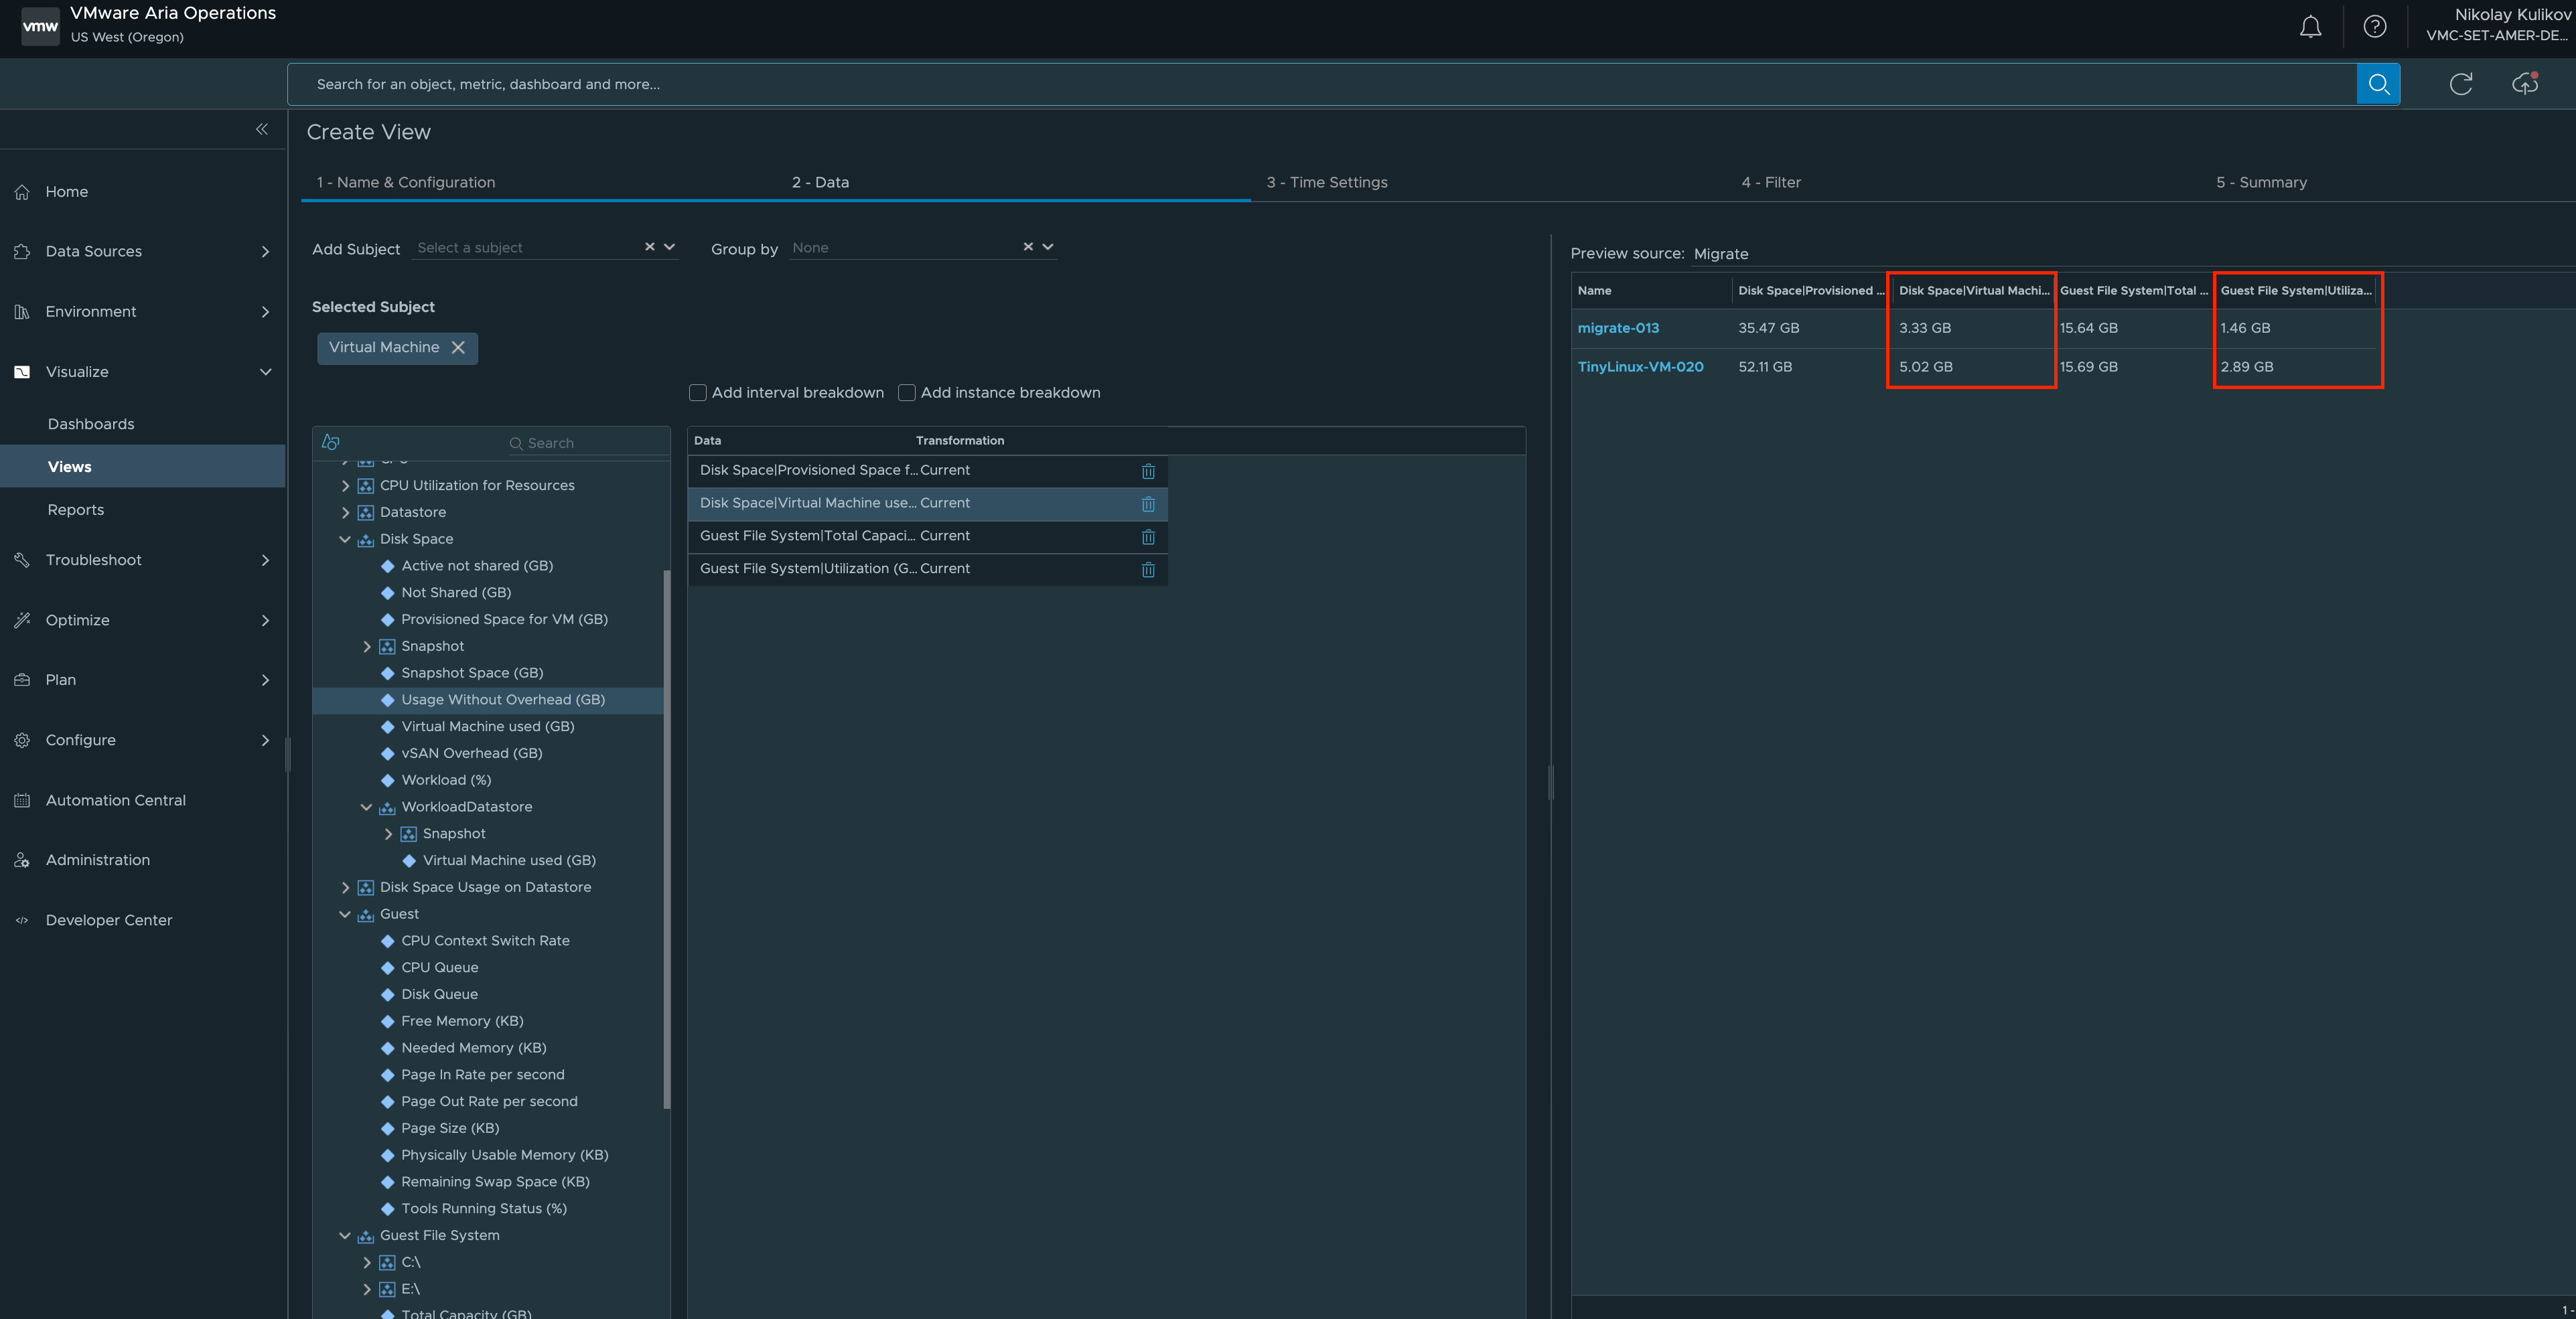
Aria Operations unfortunately doesn't have a built-in report or View, but we can make one very quickly ourselves:
How to enable TRIM/UNMAP
In order for everything to work as it should we need two main factors - for the OS to send TRIM/UNMAP/Deallocate commands (depending on the virtual controller used) and for the storage system (vSAN in our case) to properly manage them.
If we are talking about vSAN itself, TRIM/UNMAP support was introduced in it quite a bit more than 5 years ago in vSAN 6.7U1. In VMC on AWS minimal versions that support TRIM/UNMAP is 1.18v12 or 1.20v4. For vSAN, TRIM/UNMAP is a cluster level feature and is disabled by default in OSA (in ESA, which I will talk about later, it is enabled immediately), but since vSAN 8 it can now be enabled via a single button in the vSphere Client. But since in VMC on AWS you don't have permissions to change the cluster configuration, you just need to contact support/CSM and ask them to enable it, specifying the cluster where you want to do it. If you have any doubts about whether it is enabled or not, you can just look it up in the vSphere Client or with PowerCLI.
The second part of this task is to make the OS send commands to free up space. TRIM/UNMAP is supported for both Linux and Windows and require Virtual Machine Hardware version 11 for Windows and 13 for Linux (nevertheless for vNVMe controllers the minimal version is v14 for both Windows and Linux). As a reminder, the default version for all new VMs for all current VMC versions is 14, so it shouldn't be a problem, but when migrating from on-premise, some machines may have an older version, so it's worth checking and upgrade vHW if needed.
Second, the guest operating system must detect that the block device (vmdk in that case) supports TRIM/UNMAP. If the VMs are already running on a cluster that did not have TRIM/UNMAP, this flag is not active because it is set when the VM starts up. Thus, a Power Cycle (not just a reboot) will need to be performed for all VMs. On the one hand, this may look hard and complicated, but the good news is that VMs can safely continue to run on the cluster after TRIM/UNMAP is enabled without any consequences, just Space Reclamation will not work for them. And during the next scheduled updates, maintenance, etc perform Power Cycle. To keep this out of your head, you can set an additional parameter vmx.reboot.PowerCycle=True for the VMs, which will do a full Power Cycle on the next reboot operation instead (BTW, I wrote above about the possible need to raise the vHW version, so you can use a somewhat similar function that shuts down the VM on the next reboot). After the following Power Cycle, this value is automatically reset to the default state (False). For all new VMs created on the cluster after TRIM/UNMAP is enabled, it will work immediately.
The last step is for the operating system to transmit a list of freed blocks. I don't want to go into detail here, because it's better to refer to your OS manual instead.
I will only mention that starting from Windows Server 2012 automatic space clearing is enabled by default, but it is worth checking, for example, via PowerShell (Get-ItemProperty -Path "HKLM:\System\CurrentControlSet\Control\FileSystem" -Name DisableDeleteNotification). You can also run the cleanup manually by running Defrag or Optimize-Volume, but of course it is better to let it run automatically.
For Linux, this is usually done by running fstrim. The availability of automatic cleanup depends on the distro - some of them (e.g. Ubuntu, SUSE, etc) have it enabled by default, and the frequency can be customized in the corresponding configuration files. Of course, you can also run it manually as well.
So, if you enable TRIM/UNMAP on the cluster, run Power Cycle on the VM, and make sure that the cleanup is scheduled and executed automatically at the guest OS level, then after some time (usually 1-7 days), you will see additional space "magically" appear on vSAN. Note that at first this can be quite an active process (simply because a rather large list of freed blocks may have been accumulated), but then it is usually not a massive process, but rather a background process that keeps the thin disks of the VMs from further growth.
Summary and Next Steps
Surprisingly, it turns out that following these steps is more than enough in many cases. And further optimization may not be necessary because vSAN already provides you with all the capacity you need.
But if that's not the case, let's talk about other ways to ensure even greater storage efficiency in VMC on AWS in the Part2.